Monday, March 19, 2012

Bathroom - Before & After

Happy Monday! It's a happy one here, it was over eighty degrees today! It's been like this for a week now. For March it's unheard of. We've literally been outside from morning to night, biking to school, to the beach, everywhere really. I feel like I have to pack all my summer madness in quickly because I know this will not last! I think we are thirty degrees over normal for this time of year. I love it, and it's inspired me to finish some projects. And do some wild and crazy stuff like try out the enourmous clothesline that came with our house. I'm hooked, I can't believe how fast our clothes dry and they smell amazing:) Yesterday I hung all of our bedsheets to dry, it was such a treat to jump into them last night. I'm all about the little things.

I'm going to start the week out with our one and only bathroom - before & after. So here we go...


Before

Here is our bathroom when we bought the house. The tile was new, plaster in good shape and the vanity/cabinets had some potential. On the downside, the tan and blue flowered plastic tile on the walls was weird and the sliding glass doors on the tub had to go. Not too bad for now. Eventually this bathroom will get a major redo but I have grown to like its quirks for now.


Yup, I just prefer shower curtains. Plus it covers up the ugly plastic insert in the shower. When we are ready to tackle this, I'm thinking white subway tile and either reglazing the tub (i like it's 50's styling) or replacing it with an atique clawfoot. Or maybe just keep the tub here and when we add on that amazing master bath, put the clawfoot in there. Yes, I've always been a dreamer;)


After

Now here's what a little white paint can do.


The vanity is fun with the original linoleum top.


I swapped the old towel bar for hooks and used a basket to store clean towels. The hooks were $7.00 each at Lowes, the towels from Meijer for $4.99 each and framed photos from target for $19.99.


It's not visible in this picture but there's a really cute window in the shower. The window is high enough for privacy but big, and swings all the way open so it's feels like your taking a shower outside. Love that!


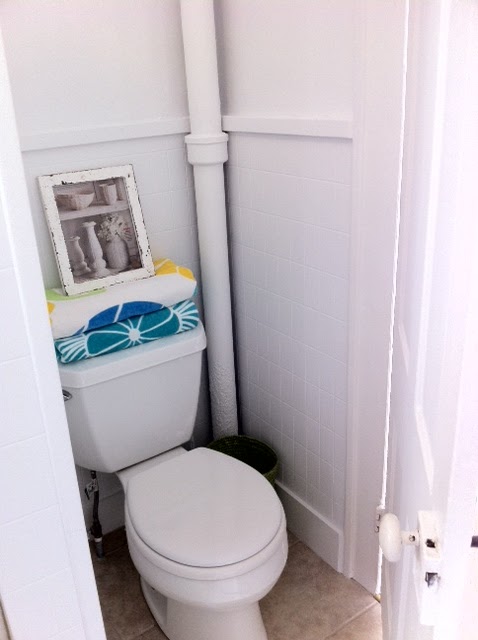
I'm not sure why I'm adding a picture of our toilet, maybe so you know we have one? Well, I do like the old vent pipe in the corner. I think most people would try to hide it but I like it.


Happy Monday:) XO

Thursday, March 15, 2012

Living Room - Before & After

Hi there!

Today I though I'd post the progress we've made on our living room. We really haven't done much, fortunately this room was almost is "like new" condition when we bought the house. However, we have seen this room in a much worse state. We actually looked at our house a year before we bought it. Many of the before pictures i have and will be posting (with the exception of the upstairs) were much worse when we originally looked at this house. At that point it hadn't been touched since the 50's which had taken it's toll. The living room walls were separated from the floors a couple inches which was major, and the rest of the house was really, just in a bad state. We loved the lot, location and size of the house but the renovations were too extensive for our budget and too adventurous with two small children. Long story short, the owners took the house off the market to renovate in hopes of getting a fair price. They reinforced the floors, put new flooring throughout the main level, fresh paint, new drywall in the living room and trim where necessary, etc., etc. I think we looked at our house the second time, the day after it came back on the market and well, here we are! So, again, there's not much to look at as far as major change for this room but still fun to check out:)


Before

This room looks GREAT compared to the before, before, as i mentioned above! However this taupe was just all wrong. So really all I had to do was paint! I'm not crazy about the red oak floors they laid either but they do just fine for now! We lost the original hardwoods in this room when they reinforced the floors. As far as we know the originals are still under the multiple layers of other flooring in the rest of the house. At some point we will investigate further, if the floors are salvageable I'd like to match them with reclaimed in this room.


I think it's pretty obvious I'm into everything beach and cottage. 


Who looks at the size of the front door when they buy a home? Well that's what we were asking ourselves when we couldn't fit our furniture through the 28" hobbit door. Soooo, we had a garage sale. And we bought new smaller scale furniture. The room is narrow, 11'x17' so it worked out well. The couches and chairs are down filled and slipcovered. They were our big splurge in the house, love them:) The bamboo roman shades I bought from Overstock. I think I spent around $400.00 total for shades for the whole house, not bad. The fun framed poster i got for 70% off at Micheals. Works for me!


This end table is a vintage folding table I picked up at an antique store. I paid $35.00 for it which was probably way too much but it was the perfect height and size for the awkward space. It also has cute curved legs and a planked top that just appealed to me. It had a really bad spray paint job so I repainted it Benjamin Moore, Barely Teal. Love that color! The lamp is from T.J. Maxx, the driftwood fish from Pottery Barn Teen on clearance and basket from Meijer (local grocery store).


My round pedestal table I picked up for $100.00 at Wilson's, one of the many antique stores in our area. It was more than I wanted to spend but again, the perfect size. Not to mention, it's solid mahogany and I loved it's rich color next to all of my white, white and more white! The lamp is from Art Van. I scored the floor model so instead of $150.00, I got it for $60.00. I love the texture. And there's my DIY Union Jack wall hanging.


Here's the front door, painted Benjamin Moore's Jamaican Aqua.


I found this table at a secondhand shop and repurposed it into a entertainment center. It's only a foot deep so it works great for our narrow space.


That's it for our living room! I hope to take another break form before & after's with an update on my wall of frames. I know, the things I get excited about...;) I've been painting frames the last couple of days to add to my collection which includes the two vintage photos I posted about earlier this week. See you soon! XO Kelly

Wednesday, March 14, 2012

Caden's Room - Before & After

It's another round of Before & After! Today is my son's room, Caden. If you saw Sophia's room, it was basically the same renovation. As I mentioned in her post, the upstairs of our house was in poor shape, really unlivable. So here we go!

Before

This is how the room looked when we bought the house. Ceiling tiles, paneling, linoleum floors and windows were all hideous and in poor shape.


This is how the room looked after we removed the ceiling tiles and paneling. Not much better!!!


After

Updates/Upgrades: Drywall installed (professionally); window sashes removed, scraped, painted and reinstalled; window casings and sills scraped and painted; remove linoleum from floors and painted with multiple layers of porch and floor paint; new light fixture; window treatments.


The walls are pretty blank right now. I'm having a hard time finding boy decor I like. I'd like to find some items that he can grow with, not to babyish but still fun! Speaking of the white walls, my mom helped me paint the entire upstairs in 100 degree heat! Couldn't have done it without her! Thanks Mom!!!


If the bed looks really small that's because it is, it's a toddler bed passed down from his sister. He LOVES it! He was so excited to move out of a crib and to get his big sister's bed! My awesome Aunt gave me the the cute red bench and my mom passed down the the wicker table. I sprayed the table with the same paint I used on Sophia bed.


I made Caden's duvet cover. The down insert is from Pottery Barn Kids. He's able to use it year round, I've got a lot of mileage out of it. Sophia used it before him with a different cover. The pillow case and sham are from Pottery Barn on Clearance.


I really wanted Schoolhouse lights for the kids rooms but could not find any locally, vintage or new. There are a couple online sites that specialize in them but they were more than I wanted to spend. Plus I needed a smaller scale, flush mount light because of the lower ceilings. I ended up finding a globe for a ceiling fan (in a schoolhouse shape) and then bought the cheapest light with a housing that would mate with the globe. I made three of these for $12.00 each. Can't beat it! The chair was from T.J. Maxx on clearance and I made the pillow.


Gotta love a good bargain - the paddles were $7.00 each from T.J. Maxx and the dresser from a children's secondhand shop.


That's it for now!!! I'll be posting our living room tomorrow! XO Kelly

Monday, March 12, 2012

Vintage Photos

I love Vintage, especially when it's personal and a part of my family. My mom gave me a couple framed photos of my grandparents that are WAY cool!!! I can't wait to get the frames painted and add them to my "wall of frames!"

This photo is of my grandfather in the Air Force. He is in the upper right corner. I love the size of the photo and how they are standing in formation. It almost looks graphic.


The photos here are my grandparents as children. Come on, how sweet is that! I can't believe I get to look at these two everytime I climb my stairs:)


Here is the status of my "wall of frames." I started at the top of the stairs and the bottom so I have a gaping hole in middle. My new treasures will fit nicely somewhere right in there.


XO, Kelly

My Tanker Desk

Hi there! Over the weekend I was lucky enough to score a Tanker Desk off Craigslist. I moved our small desk upstairs for the kids in hopes to find something like this. I needed something bigger that would function better for my many projects. The Tanker fit the bill and it has an industrial/retro design that I love. I would put the Tanker in the "so ugly it's cool" category. My "office" is in our bedroom where I have other funky junk so my Tanker fits in well. Here it is after some elbow grease.


Tanker desks have been in production since 1946. My desk is a Steelcase version, I'm guessing from the 60's. I think the double pedestals and funky desktops are too cool. The tops were made with either metal, wood or a wide range of retro laminates. Obviously mine is a wood grain laminate that oddly enough fits in with the decor. I'll post more photos of my bedroom in a few days as one of my before & after posts.


Tankers have a developed a following, and there are a couple companies that restore them. The older Tankers are more coveted for their even curvier lines. Tankers were mass produced and extremely popular in their time so they are relatively easy to find for cheap or sometimes free if you are willing to move them. They are HEAVY! Here is more information on Tanker desks if you're interested: http://www.apartmenttherapy.com/the-tanker-desk-an-american-mo-126417


XO, Kelly

Sunday, March 11, 2012

Playroom - Before & After

Hi all! Hope everyone is having a great weekend! The weather is gorgeous!!! I'm loving the extra hour of sun we are about to have:) I'm waiting for my little guy to wake up from his nap so we can go back outside! So while I'm waiting, I thought I'd post the kid's playroom photos. This room was in good shape so all we did was paint. It does have paneling and ceiling tiles (ugh!) but we painted them and they look fine for now. If you saw my post of the upstairs "before" pictures you can see what we're up against. It's easier for us to take this renovation is small doses because one thing almost always leads to another!

Before


After

The play table I purchased on clearance, plus 20% off from Pottery Barn. The chairs were found at our local Restore for $5.00 each! Can't beat that!


Sophia is in Preschool this year so she comes home with an endless amount of the cutest artwork. I used command hooks, twine and clothes pins to display it. I love how easy is it to swap out her creations! Gotta love Pinterest!


Every Playroom needs a good kitchen! We have some amazing creations come out of here:)


Thursday, March 8, 2012

Sophia's Bedroom - Before & After

My daughter Sophia's room was one of our biggest transformations. When we bought our house the entire upstairs was not in livable condition. The ceilings and walls were covered with dilapidated ceiling tiles and paneling. The floors were original hardwoods but in poor shape. The windows were working properly and most retained the original "wavy" glass but the window casings, sills and sashes need lots of TLC.

Before

This is how the room looked when we bought the house. NOT PRETTY.


This is how the room looked after we removed the ceiling tiles and paneling. The plaster walls were NOT PRETTY! There were huge holes from wiring updates and the walls overall were just crumbling. Not to mention the layers of wallpaper! I was hoping we could just skim coat the paster, however that was not the case so we decided to call in the experts and have the walls drywalled.


After

Updates/Upgrades: Drywall installed (professionally); window sashes removed, scraped, painted and reinstalled; window casings and sills scraped and painted; floors painted with multiple layers of porch and floor paint; new light fixture; window treatments.


Sophia's dresser was put out on the curb by our neighbors. With a few coats of fresh paint it was good as new and FREE! I love it because it's tall and narrow so it hardly takes any floor space. Her room is tiny, 13'x7'.


The bed was also a great find at the local Salvation Army for $25.00. I couldn't find a spray paint color off the shelf I liked so I had a Benjamin Moore color mixed and put in spray cans at an auto parts store.


The fabric for Sophia's bedding was purchased for 1/2 off at our local fabric store. My mom made the duvet. Thanks Mom! The pillows are from Pottery Barn on sale and T.J. Maxx.


Every little girl needs some pom pom garland and lots of hooks for bathing suits and other fun stuff!


Cute wicker table passed down from my mom. I sprayed it with the same paint I used on her bed. The sign was purchased from a store that carries all locally made products and vintage.


The floors weren't in good enough shape to restore so we decided to paint them. I have always loved the look of painted hardwood floors. We used Benjamin Moore Porch & Floor paint and they turned out great. The closet is big for the overall size of her room. She will fill it up in no time;)


I hope you enjoyed Sophia's room! Well worth the blood, SWEAT, & tears!!!

Wednesday, March 7, 2012

Welcome to my first blog!

Welcome to my first blog! This blog will display what I'd like to share from my daily life. I thought I'd begin with some before and after photos of our new, very old house since this has been consuming much of my time lately. And will for a very long time!

We live in Traverse City, Michigan which sits on a large bay of Lake Michigan. We love it here. We are lucky enough to have pristine beaches in the Summer, colored Falls and very white Winters. We bought our first home in the downtown district, walking distance to all of the fun stuff:) The house is a 120-year old, Victorian/Early Bungalow. Every room in our house is "in progress" but here is where we are at.

Kitchen Before


Washer and dryer hookups but without a fridg or stove!


Kitchen After

Updates/Upgrades: paint, hardware, sink faucet, heat vent relocated, removed washer & dryer hookups and added new appliances.